Repurposing Onesies
I love to repurpose items. There is something gratifying about taking something you already own, but don't use, and transforming it into something you use regularly.

In this instance, Violet had quite a few onesies that weren't being used. I'm not a fan of snaps and I prefer my little person in t-shirts so I can access her diaper without having to unbutton the top.
So, the first steps were to iron my onesies, cut them, and hem them to make them into t-shirts.

However, doing this, I realized that some of the onesies were too vertical on the sides. I like my girl to have a little flair, so on a couple I inserted triangles of fabric in the sides to give them a more feminine silhouette.


Now, I had a pile of cute t-shirts! Perfect!

*I did not show how I did the hem in photos. However, I just folded the fabric over, ironed it, pinned it, and used a zig zag stitch all around the bottom. If you have a serger, this would work even better.
However, I am also a fan of a sweet Peter Pan collar. I looked at a bunch of tutorials and different ways to add them, and decided on this easy version where only the front of the shirt has the collar. I use the shirts as an outline and made small little patterns from notebook paper.
Here is one of the you tube tutorials I found that helped me the most. (Although I still did a bit differently) I really like Annika's tutorials and reccomend you check out her channel, here. She explains things very clearly and has great graphics.
For each collar, I cut four pieces of fabric, 2 for each bib. I sewed wrong sides together around the bottom, leaving the top portion open. I flipped the collars inside out, ironed them, and trimmed some fuseable interfacing to stick in the little bib pocket. Then I ironed them again. I used the fuseable interfacing because as any true Peter Pan collar fan knows, there is nothing more annoying then your collar absolutely refusing to stay down and flipping up. I'm sure Madeline had similar issues, although being French, she may have naturally avoided them.

One I had my collars ready to be attached, nice and stiff with their interfacing and all ironed, I turned the shirt inside out and sewed the collars on as close to the hem as possible. I then turned the shirt right side out, and stitched the collars again around the top. This last step ensures (along with the interfacing) that your collar will not pop up.

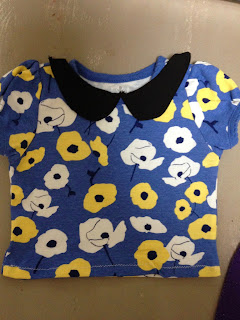

I do think tops are even cuter when the collar goes around the entire shirt, but I am plenty happy with Violet's t-shirts and I wanted to be able to do them quickly with little stress.
What other easy DIYs do you do?


In this instance, Violet had quite a few onesies that weren't being used. I'm not a fan of snaps and I prefer my little person in t-shirts so I can access her diaper without having to unbutton the top.
So, the first steps were to iron my onesies, cut them, and hem them to make them into t-shirts.

(I didn't think to take a photo until after I had cute them and turned them inside out...so use your imagination that this is a normal onesie)
However, doing this, I realized that some of the onesies were too vertical on the sides. I like my girl to have a little flair, so on a couple I inserted triangles of fabric in the sides to give them a more feminine silhouette.

(Shirt turned inside out, cut at the side seam and a piece of extra fabric from the lower part of the onesie inserted using pins. You can do this much neater, but I was experimenting and making this for a 10 month old who has already vomitted on it twice...so low bar for handiwork)

(Inserted triangle of fabric on the side seam)

(Ruffles bottom with side fabric inserted on side seams, onesie is now a cute girly t-shirt!)
Now, I had a pile of cute t-shirts! Perfect!

*I did not show how I did the hem in photos. However, I just folded the fabric over, ironed it, pinned it, and used a zig zag stitch all around the bottom. If you have a serger, this would work even better.
However, I am also a fan of a sweet Peter Pan collar. I looked at a bunch of tutorials and different ways to add them, and decided on this easy version where only the front of the shirt has the collar. I use the shirts as an outline and made small little patterns from notebook paper.
Here is one of the you tube tutorials I found that helped me the most. (Although I still did a bit differently) I really like Annika's tutorials and reccomend you check out her channel, here. She explains things very clearly and has great graphics.
For each collar, I cut four pieces of fabric, 2 for each bib. I sewed wrong sides together around the bottom, leaving the top portion open. I flipped the collars inside out, ironed them, and trimmed some fuseable interfacing to stick in the little bib pocket. Then I ironed them again. I used the fuseable interfacing because as any true Peter Pan collar fan knows, there is nothing more annoying then your collar absolutely refusing to stay down and flipping up. I'm sure Madeline had similar issues, although being French, she may have naturally avoided them.
(Image is from here)
One I had my collars ready to be attached, nice and stiff with their interfacing and all ironed, I turned the shirt inside out and sewed the collars on as close to the hem as possible. I then turned the shirt right side out, and stitched the collars again around the top. This last step ensures (along with the interfacing) that your collar will not pop up.


I do think tops are even cuter when the collar goes around the entire shirt, but I am plenty happy with Violet's t-shirts and I wanted to be able to do them quickly with little stress.
What other easy DIYs do you do?

(Not perfect, a bit lopsided, but not really noticeable once on the baby. I got better at positioning with every collar, practice makes...well better)


(Collars are not tantrum proof...sorry)


So cute! I always preferred the snaps holding the shirt together, but I love adding the collar to it. And the ruffles and flare are just perfect! Good Work!
ReplyDeleteThank you!
Delete